background

Wednesday, December 18, 2013

Christmas at MY house

Welcome to MY house! Grab some coffee and make yourself comfy


It's Christmas time and I wanted to share with you a few of my favorite things and vignettes that I have placed around the house. Everything from vintage to handmade to hand me downs. All these collected treasures make our house feel like Christmas
 
 
I am in LOVE with my vintage alarm clock collection and keep them all nestled together for a dramatic pop. My collection grows slowly and I am always thrilled when I stumble upon one in an unexpected place. Some I have grabbed at garage sales, others in thrift stores and there are the occasional few that I grab at specialty shops (and pay a bit more) because I can't resist their charm!
 
 
 I tossed in some of my collected vintage Christmas postcards and they stand proudly in my OTHER favorite collection, floral frogs!


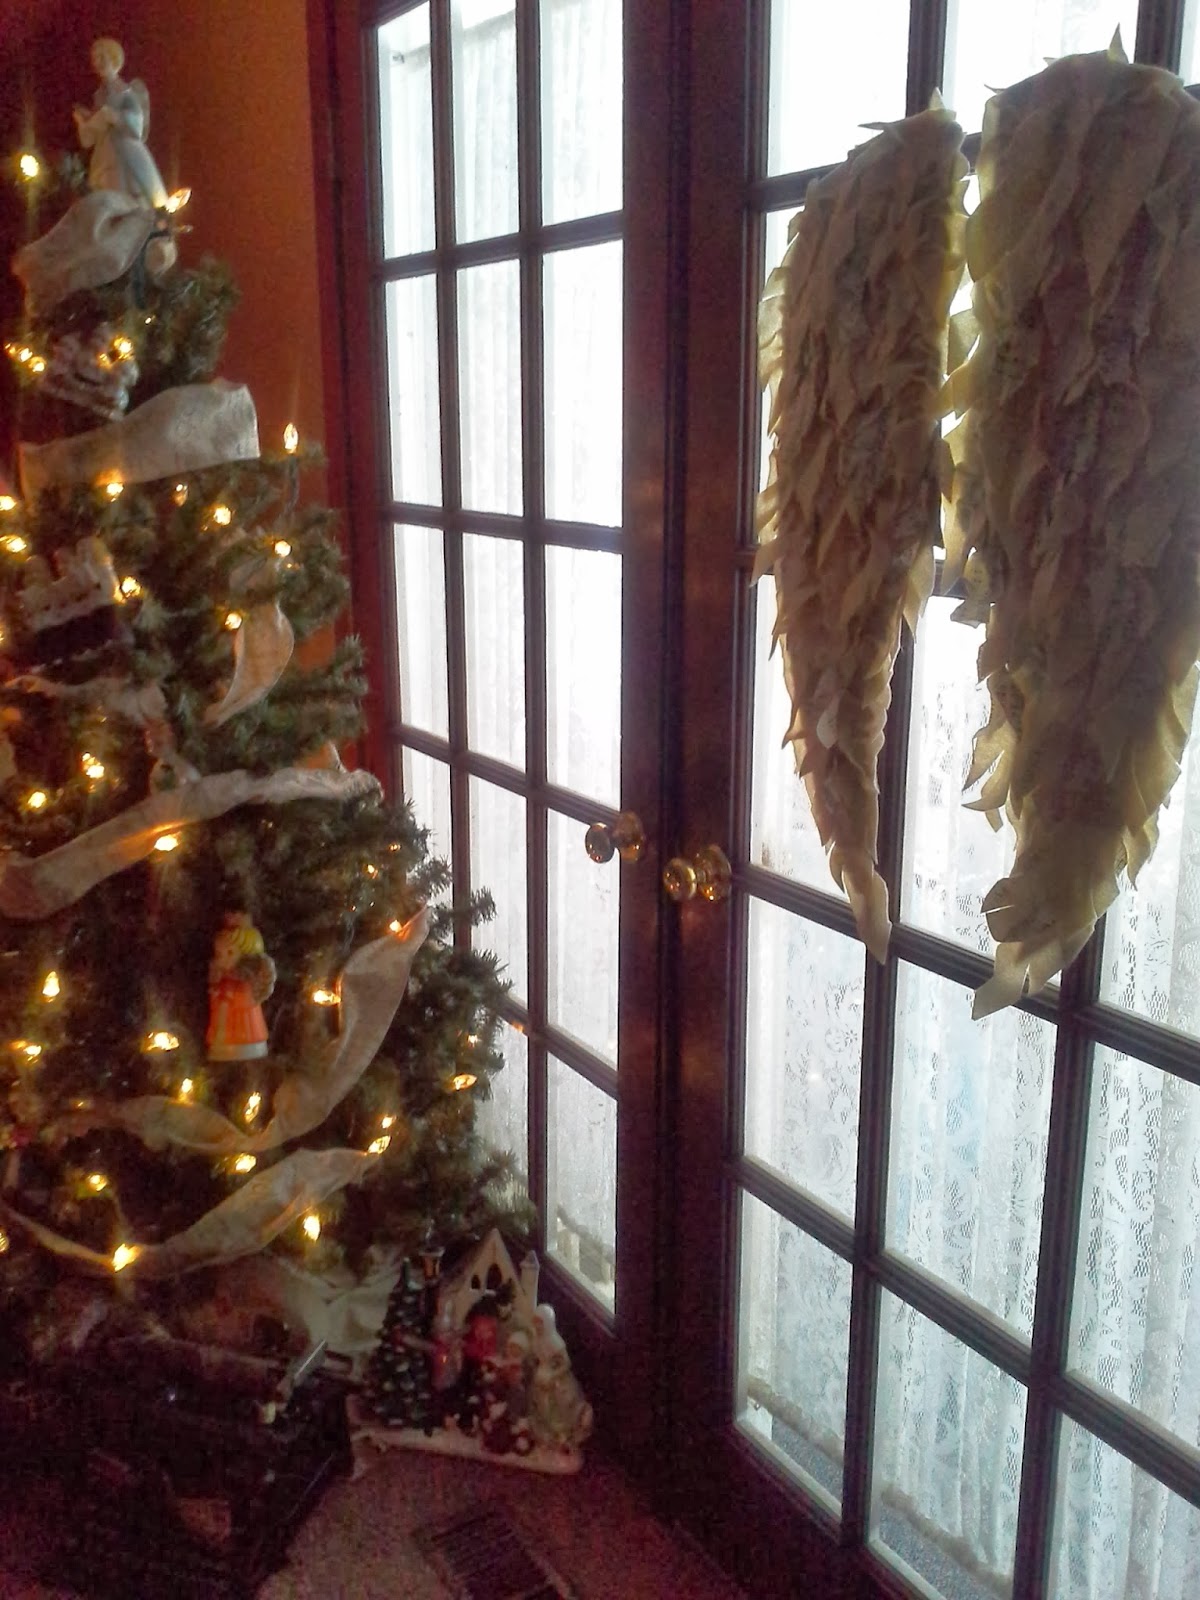
Next would be my "hand me down". This fun wreath was my grandmother's and I cherish it. It finds a different place every Christmas, sometimes as the "star" front and center on the mantel, sometimes tucked in the tree. This year it hangs on a vintage window that I have filled with old papers and is in the rear entry so we see it every time we come and go. It always brings back floods of memories of Christmas with my Gram.

 
The tree in our home office sports our ever evolving collection of vintage carolers. I simply wire them to the branches and they "sing" to us as we get our work done :)
 
 
Some items that draw your attention or trigger a Christmas memory may not always 'fit' with your décor taste or style but could be added to a Christmas tree for a different twist!
 
 
Beneath the tree is another hand me down from my other grandmother. This vintage typewriter hold many memories and just like the wreath from gram, this piece always finds a new place to rest in my home. I have stuffed the roller and keys with ephemera and it is a statement piece all on its own.
 
 
This year I went with a white tree and love how it turned out. I dug through my stash of ornaments and chose those that were white, gray, silver with tiny pops of vintage blue. I am sort of an ornament hoarder and have done trees in all sorts of color schemes!
 
 
My mom made me this adorable snowman all in white a few years back and he just looks so happy in his new white tree this year! 
 
 
For those of you that know me, you know I have a 'thing' for suitcases! I finally wised up this year and will be storing all of my Christmas decorations in them! They have sat empty all this time. It will make decorating NEXT year so much easier and will clear up some space in the basement!


Collect what you LOVE, love what you collect and display it PROUDLY.
Tell YOUR story in your  home. Make your home your comfy nest.

 
Thanks so much for visiting! AND Merry Christmas to you ALL!


Monday, October 14, 2013

Chic Gift Bag Tutorial


With the holidays fast approaching you may find the need to a quick, chic, gift to give a friend! These are made from simple items you probably already have! Just a couple punches, a little glue, ink and a favorite rubber stamp and voila! A pretty package anyone would love to receive!

Here are the supplies you will need:


A simple lunch bag, a border punch, ink, rubber stamp, clothes pin and hot glue gun

 
Start by punching the open end of the brown lunch bag.
 

Border punches are great because they have a guide. Simply line up what you just punched with the printed design right on the punch and punch again. Repeat until entire top is punched.

 
Next, fold the top over. You can choose how far you fold this based on the size of the goodies you will be putting inside.


Now stamp the bag with your favorite stamp(s) to add some character. Stamp a little, or a lot. It's up to you.

 
For the closure, I chose to use a clothes pin that I adorned with a little bling. First I cut strips of a book page and hot glued that on. Then topped it off with a strip of bling. You can get creative here and glue vintage jewelry, buttons, etc on there for a different look.
 

There you have it! Now fill your bag with a candle, candy, baked goods....you decide! Quick, easy and oh so chic! Your friends are going to be impressed!


Thanks for stopping by! I hope you enjoyed this tutorial and it inspires you to create a little something! Visit my facebook page too for more inspiration. Drop me a note, send me some pictures of what you create! I love hearing from all of you!


Monday, September 30, 2013

Repurposed Book Page Wreath


I just LOVE old books. I love collecting them. Using them in displays in my home and shop. I like using them to add height to a vignette. But even better.....I love to make things from them!

Especially the ones with missing covers. They are often tossed aside, thrown away and never appreciated...UNTIL NOW!

 
These look FABULOUS when added to your décor! Hang on your door, above the mantel.....you decide. I OFTEN get asked how I made them, so I made a little tutorial here for you to try your hand at it!
 
You start with a simple circle out of cardboard. I happened to have a stack of it, but you could use anything from an cereal box to the back of a notebook.
 
Here I just used a bowl I had to trace a circle. You decide how big or small you want it to be. Mine is about the size of a dinner plate.

 
When you are finished cutting out your circle, find a smaller dish to trace a smaller circle inside. Draw a big dot in the center (just eyeball this...its really ok).
 
Then make four hash marks around the edges at the 12 o'clock, 3 o'clock, 6 o'clock and 9 o'clock spots.
 
These are your "guides"---trust me, you want to take the time to do this step. They help guide you and ensures that your wreath comes out symmetrical and not lop-sided.....I learned this the hard way!
 

Now you begin tearing out the pages (remember you can also make these with sheet music too!) Then START ROLLING! You will roll each page into a cone and simply secure with a piece of tape--don't worry, it won't show once the wreath is put together.

You need to roll LOTS and LOTS of these. It is a great thing to do while watching TV. For my wreaths I end up needing about 50-60 cones :)


Now that you are SICK of rolling cones (hee hee). It's time to bring back that cardboard circle you make. Use the inner circle as your guide for how far these will go to the center and hot glue one cone on each of your hash marks.

 
Now simply fill in each "section" between your initial four cones with MORE cones. It should then look like the above picture.


Next, use the center dot that you drew as the guide for placing the top row of cones. Start by placing four. Eyeballing their placement at approximately 12 o'clock, 3 o'clock, 6 o'clock and 9 o'clock (like the first row but much closer together now)
 
Then proceed with filling in each section with cones!
 
When you get done with this layer, YOU can decide what to do in the center. You could go forward with another layer. For this next photo I folded my extra cones in half and hot glued them in "standing up"


Just keeping tucking and glue-ing until you get a look you are happy with.
 

Here I just crumpled up some burlap ribbon and hot glued it in and them glued in random bobbles and pearls.


Have FUN with it! Experiment, tuck, stuff, fluff.....just play. It is easy, just time consuming but in the end you will be PROUD of what you made :)

Thanks so much for stopping by my blog! Be sure to become a follower to keep up with MORE TUTORIALS, Home Décor ideas and of course my shop ONE VINTAGE LANE in beautiful Hartville, Ohio. Be sure to visit my facebook page at www.facebook.com/onevintagelane


Thursday, August 15, 2013

Sharing the joy


Sharing my work and seeing the joy in someone's eyes when they find the PERFECT piece at my shop is so full filling to me. My passion for design and vintage decor is unstoppable! But I have to say that meeting and talking to each customer is a favorite part of everyday. We all learn from each other is so many ways, and so many of my 'customers' (aka friends) bless me more than they know.


I just had to share the joy I received today from a special lady. She came in to my store and we said the normal "hi--how are you" "fine--and you?"--a friendly greeting but common at best.  She proceeded to browse the shop and then came to me and said that my store feeds her soul and that it was just what she needed today. That sentiment brought tears to both our eyes.  She praised my talent and eye for design and uplifted my soul more than she knows. Browsing my shop calmed her heart but her words wrapped me in happiness.


These are the wonderful blessings I receive everyday from the wonderful people I meet through my shop along with the blessing of getting to do what I truly LOVE everyday.

Saturday, June 1, 2013

Around the shop....

Having fun keeping things fresh and new around the shop! Wanted to share some of the wonderful photography from Debra of Beauty Tree Photography. She spent the day at One Vintage Lane and captured some great images.
I truly LOVE my job! I get to play with all these wonderful treasures everyday! I love creating new displays and helping my customers create unique looks for their homes! I believe a home should feel collected and tell your story....not furniture showroom decorated! I love to blend vintage items with current, traditional to create a wonderful vintage chic room that is full of history and charm!
I love to play with styles and trends, taking a look from rustic to chic, vintage to farmhouse, industrial to glam! I am NOT  a huge corporation--it is just little old me working hard and loving every minute of it! I do ALL of my own hunting, picking, loading, driving, cleaning, painting, displaying and so on! I love waking up on my days "off" and heading out to a fleamarket or to spend the day driving around to garage sales in the summer. Its the thrill of never knowing what you will find or what amazing item will be the big SCORE! of the day.
 
Stop in to One Vintage Lane to find your inspiration to create a new look or freshen up what you already have. Lets chat, talk about your vintage finds and treasures! It is my favorite thing to do!
I hope you found these photos inspiring and heartwarming. Look for more pictures of my shop ONE
VINTAGE LANE to be posted soon. Also check out my facebook page at www.facebook.com/onevintagelane to keep up with me!

One Vintage Lane is located at 1138 W. Maple Street (Rt. 619), Hartville, Ohio 44632
Open Mondays 10 am to 7pm. Thursdays, Fridays and Saturdays 10am to 5pm. Hope you can visit sometime.


Thursday, May 2, 2013

Inspiring Pinterest Boards!

Wanted to share a great site that has a fabulous collection of Inspiring and Creative Pinterest Boards.


http://frenchcupboard.blogspot.com/2013/01/inspiring-pinterest-linky-collection.html


Be Careful---you could get "lost" for HOURS! Have fun :)

Saturday, April 27, 2013

Kitchen Island ideas! RePurpose & ReInvent

Haven't you ALWAYS dreamed of a kitchen island? Well, it is possible AND affordable with REPURPOSING! Take a piece you already have (or one you get from ONE VINTAGE LANE!) and go for it!


 This one is a repurposed dresser! It is wonderful with the wheels because you can easily move the piece out of the way of doors, entry ways etc.
 
 
 Here is another one done with a dresser. So great for added storage in the kitchen!


We have SO many wonderful pieces available at One Vintage Lane in Hartville that could EASILY make a FABULOUS island. All shapes, styles, colors. Stop in to the shop and lets chat about YOUR ideas!
 
 
Or how about this one for a smaller space! I love it. Take the base of an old sewing machine ( you probably have one in your basement like I do! LOL) and add a precut piece of countertop, or again, an old door---Voila! Instant island.


 Or this one! For more of a French Country feel! (We have 2 of these in the shop by the way). Paint it pale to blend in room or bold to add a surprise pop of color! 
 
 
I hope these photos have inspired YOU to think outside the box for your home! Of course, stop in to One Vintage Lane 1138 W. Maple Street, Hartville, Ohio 44632 and we can talk over YOUR creative ideas and home décor needs! We love to chat!


Thursday, March 14, 2013

Spring fever--Plant something! Use vintage containers!

Here at One Vintage Lane I am always on the look out for a great new idea and a way to use and display ALL of my favorite vintage finds! Spring fever has got me wanting to add new life to the house and store! Here are some FABULOUS and EASY planting ideas I gathered from around the web and my home!
                           How FUN is this! Succulents are so beautiful, hardy and affordable!
What a statement a collection of containers makes. Wouldn't these be cute lined up on an old wooden bench on the porch!


I LOVE vintage silver items. These just add a pop of class to a display. Make a stack of books and vary the height of these on an entry table or accent area! OR put them at each place setting at a party or shower as a take home item for your guests! They will never forget you :)
Dig out those old candy dishes. They make GREAT planters to! I like to put a little bit of gravel or rocks in the bottoms of the containers as well. That helps with drainage for the water and roots.
I hope these pictures have inspired you to try something new today. As always, stop into One Vintage Lane in Hartville, Ohio. 1138 W. Maple Street. We have TONS of great and unique containers to choose from and would LOVE to help you with your creative needs. Thanks so much for stopping by.